Back in 2007 I made a vivarium for a baby Salvator Monitor and took photos for a step-by-step guide. Now, I bring it to you!
This project has a beaut of a result, but it's not for beginners. You'll need to take the time to draw up a plan for a vivarium which fits your needs. This isn'thowtobuildimpossibleprojects.com — if you have a bit of building-things experience you'll do okay. If all else fails, recruit help or talk to your local hardware store employees.
DIY 2- Build a planty, sunlit vivarium for reptiles and photosynthesis
courtesy to : www. offbeathome.com
My vivarium is mid-sized — 5 feet by 2 feet (about 1.75 meters by .75 meters) — and contains a plumbed in sink for ease of cleaning.

Supply list :
-
Plywood
-
Legs, if desired
-
Sink, plumbing bits and pieces
-
25mm polystyrene
-
Expanding foam
-
Utility knife
-
Tile adhesive/grout
-
Plant pots
-
Outdoor varnish
-
Sand
-
Ballast for a UV light
-
Wood screws
-
No More Nails — I canNOT find a link for this stuff! This is the best I can do. Anyone got one better?
-
Coco matting
-
Staple gun
-
Some purty found wood
-
Silicon caulk
-
Screw driver or power drill
-
Air vents
-
Retes stack
-
Glass
Instructions :
1-Buy wood.
2-Create the vivarium's base, back, sides, and bottom lip. I left off the top for easier access.
3-Measure and mark out space for the sink, then plumb in waste water outlet.


4-Cut a hole to set sink into the base, and cut holes for air vents.
5-Cut four layers of 25mm polystyrene sheets to support the sink.
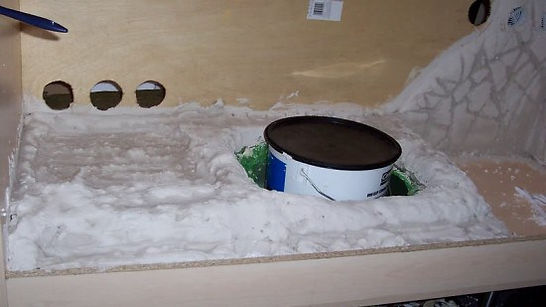
6-Fit sink. Then add two strips of polystyrene to build up a lip on draining board.


7- Cover in expanding foam.
8- Smooth the expanding foam on the draining board so that it doesn't expand too much. Trim the excess expanding foam so it slopes into sink. Cut the polystyrene sheets to form a tree root shape in the right corner of vivarium.
9-Trim out areas of expanding foam so that your chosen wood will fit.
10-Cover all of the polystyrene and expanding foam with three layers of tile adhesive/grout
11- Decide on locations for plant pots and cut out spaces for them in the expanding foam/polystyrene.

12- Cover the pots in tile adhesive/grout. There will now be fourlayers of tile adhesive in total.


13- Apply two layers of outdoor varnish to the back plywood wall.
14-Cover all fake rocks with outdoor (waterproof) varnish and sieve on dry sand. Repeat twice and finish with a final layer of outdoor varnish.
15-Cut the plants pots at an angle, leaving excess plastic on the back to make it easier to stick them to the wall.
16-Mark the position for the UV tube.
17-Mount the plant pots to the wall using screws and no more nails.


18-Cover the plant pots, back, and side walls with coco matting. Cut slits in top of pots so that you may place plants int the pots.
19-Attach coco mats with a staple gun and screws/washers. Leave loose the edges so you can seal them once the top is on.
20-Secure the natural wood pieces into the vivarium. Secure them with screws so they cannot fall and hurt your lizard!


21-Seal the bottom of all the plant pots.


22-Attach the top of the vivarium.
23-Seal all the joints in the vivarium with a kitchen/bathroom sealant.
24-Screw cocomat tightly up to sealed joints .
25-Wire in the heating and lighting.
26-Pot plants into their places on the floor and wall.
27-Add air vents — and seal them with No More Nails or another sealant.
28-Cut the glass runners to size and adhere with No More Nails.
29-Add the retes stack.
30-Add substrate/soil. Make it deep in the right side and shallow on the draining board.
31-Measure your glass for cutting. When acquired, install into the glass runners.